Deploying OneBusAway on Render.com
Render.com (“Render” for short) is a Platform as a Service (PaaS) provider that can be much easier to work with than AWS, GCP, or Azure while still offering a rich and compelling set of services for creating, orchestrating, and maintaining software using Docker and Render’s Infrastructure as Code (IaC) tooling.
Unless your needs are highly complex, or you have already evaluated and rejected Render, it is in the opinion of your author that Render will be the best bet for hosting OneBusAway in the vast majority of cases due to its comparatively intuitive user interface, clear pricing, thriving community, and responsive support services.
Overview
A basic OneBusAway deployment requires two separate services:
- MySQL Database - PlanetScale
- Docker container hosting - Render
MySQL Database - PlanetScale
Unfortunately, the OneBusAway Docker image currently only supports MySQL databases, which Render does not offer at present. When hosting on Render, we currently recommend using PlanetScale for database services. PlanetScale offers a managed MySQL solution that can scale up or down with usage, which will save you money and ensure that your database isn’t overwhelmed by traffic.
Create the Database
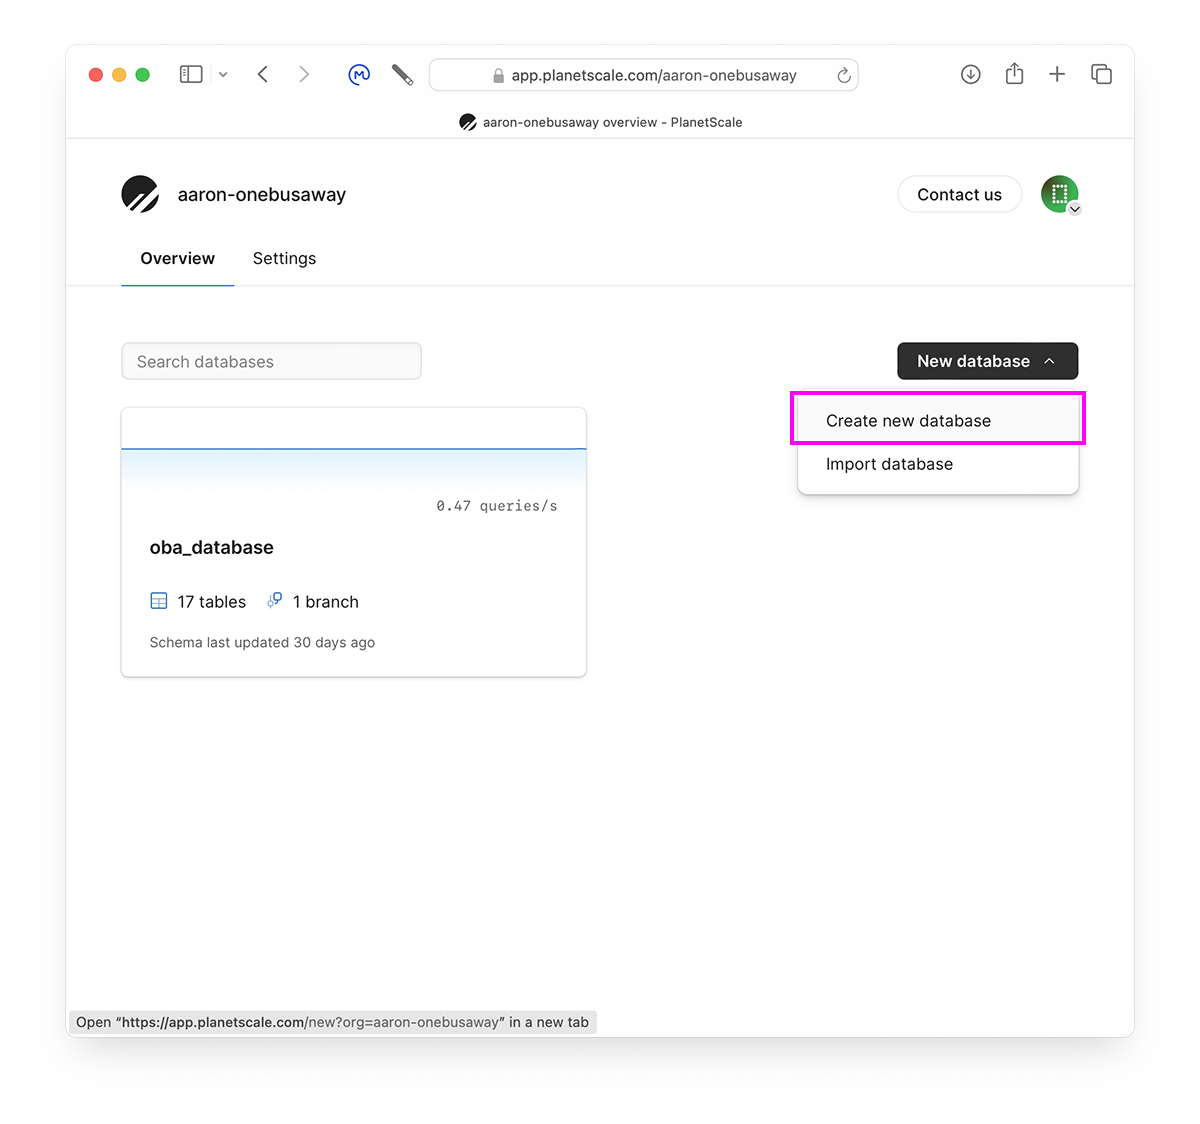
Step 1: Create new database
Once you have created a PlanetScale account, click on the “Create new database” from the dashboard.
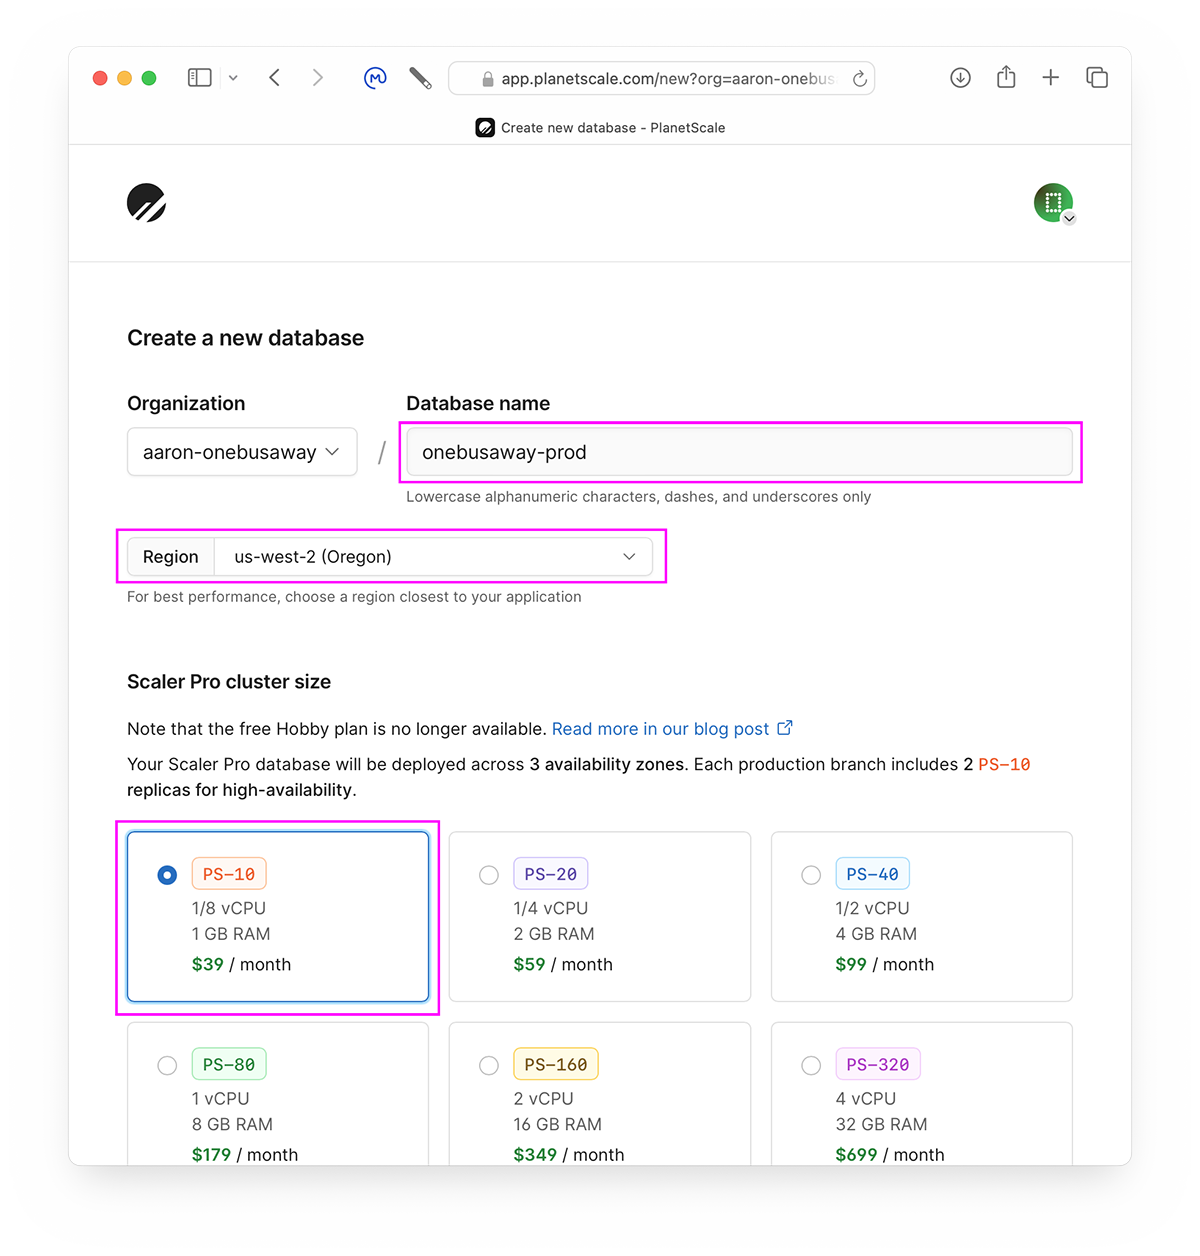
Step 2: Naming, region, and plan
Name the database, choose a region, and a plan. The name isn’t especially important, and the plan can be changed later. Choose the cheapest plan, PS-10, unless you know what your needs will require.
The region is important; choose the closest AWS region to your users from the list below:
- ap-southeast-1 (Singapore)
- us-east-2 (Ohio)
- us-west-2 (Oregon)
- eu-central-1 (Frankfurt)
These are the four regions that are supported by Render at present, and it’s vitally important that your database and web app server are in close physical proximity.
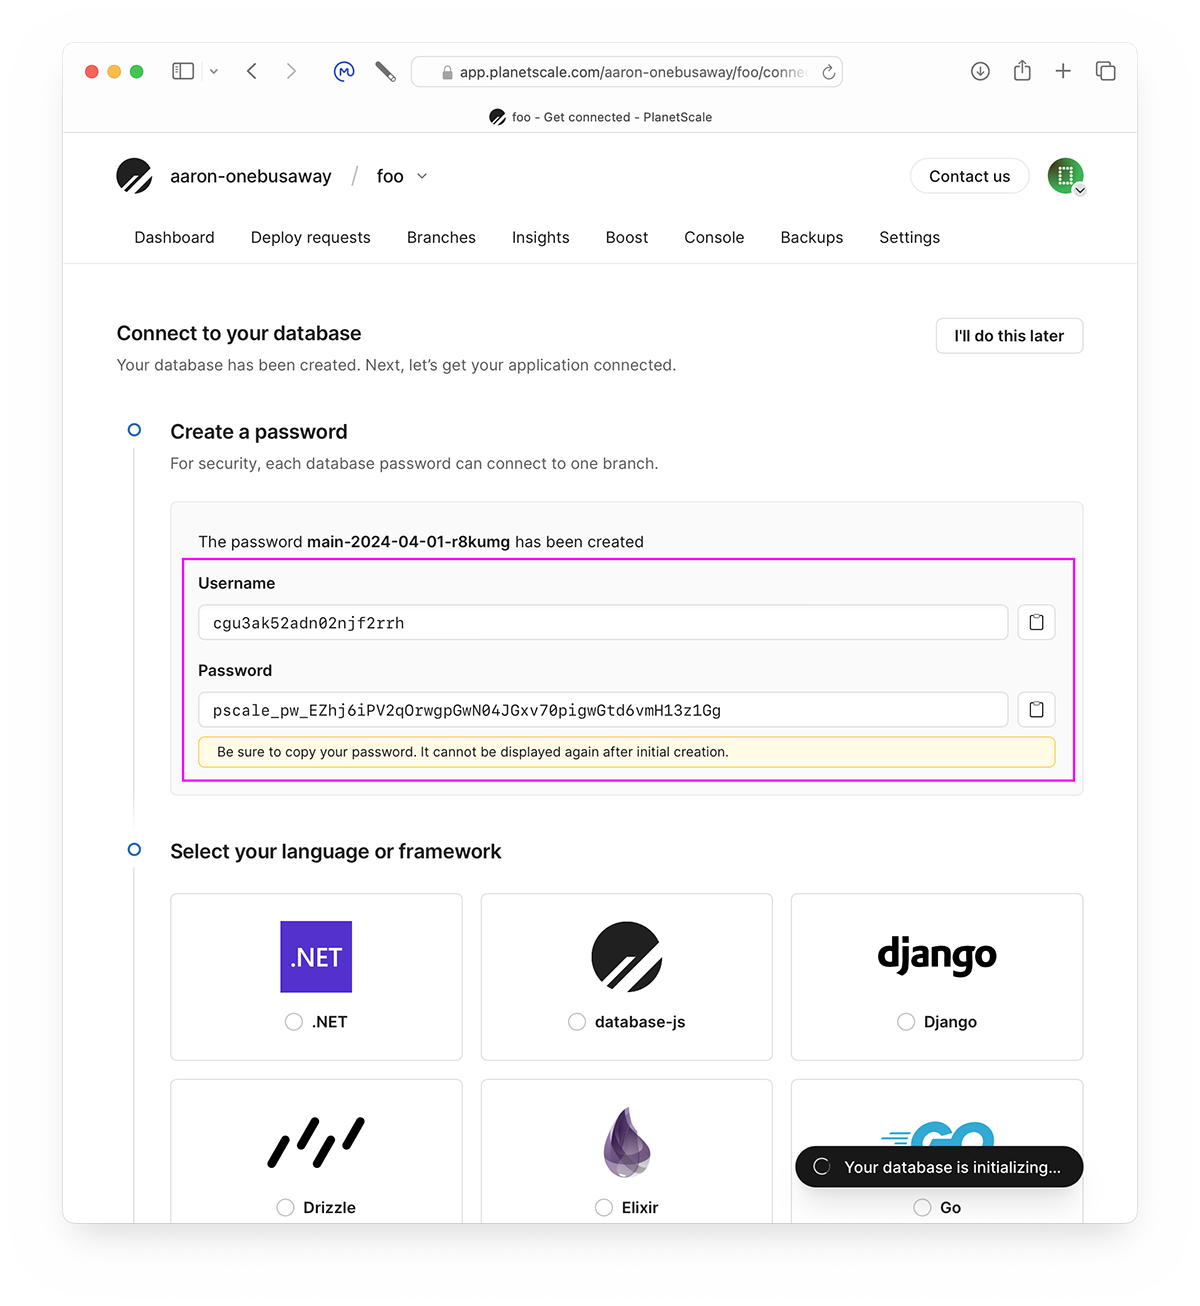
Step 3: Retrieve credentials
On the next page, PlanetScale will ask you to ‘name’ your password. This is for your own record-keeping and you can select the default unless you feel strongly about it. Click the affirmative button to go to the next step, depicted in the screenshot below.
Save your username and password somewhere secure, like in a password manager.
Under Select your language or framework, choose Java.
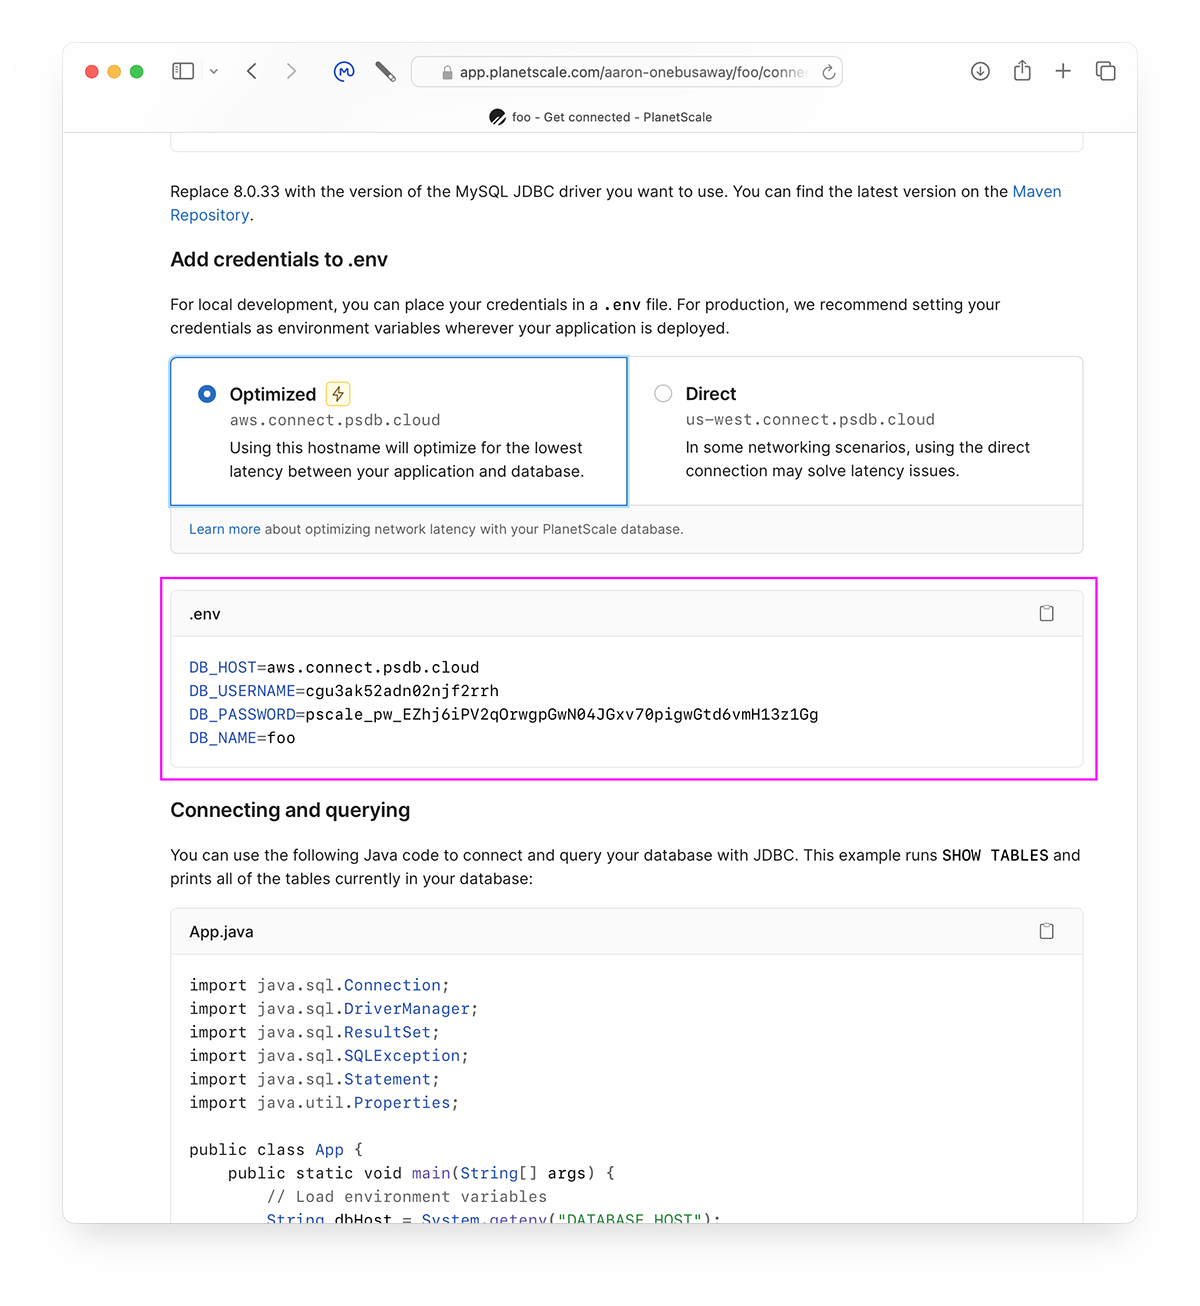
Scroll down the page to the section entitled Add credentials to .env. Copy the contents of the box labeled .env and add it to your password manager, too. Finally, scroll to the bottom of the page and click the Go to your database dashboard button.
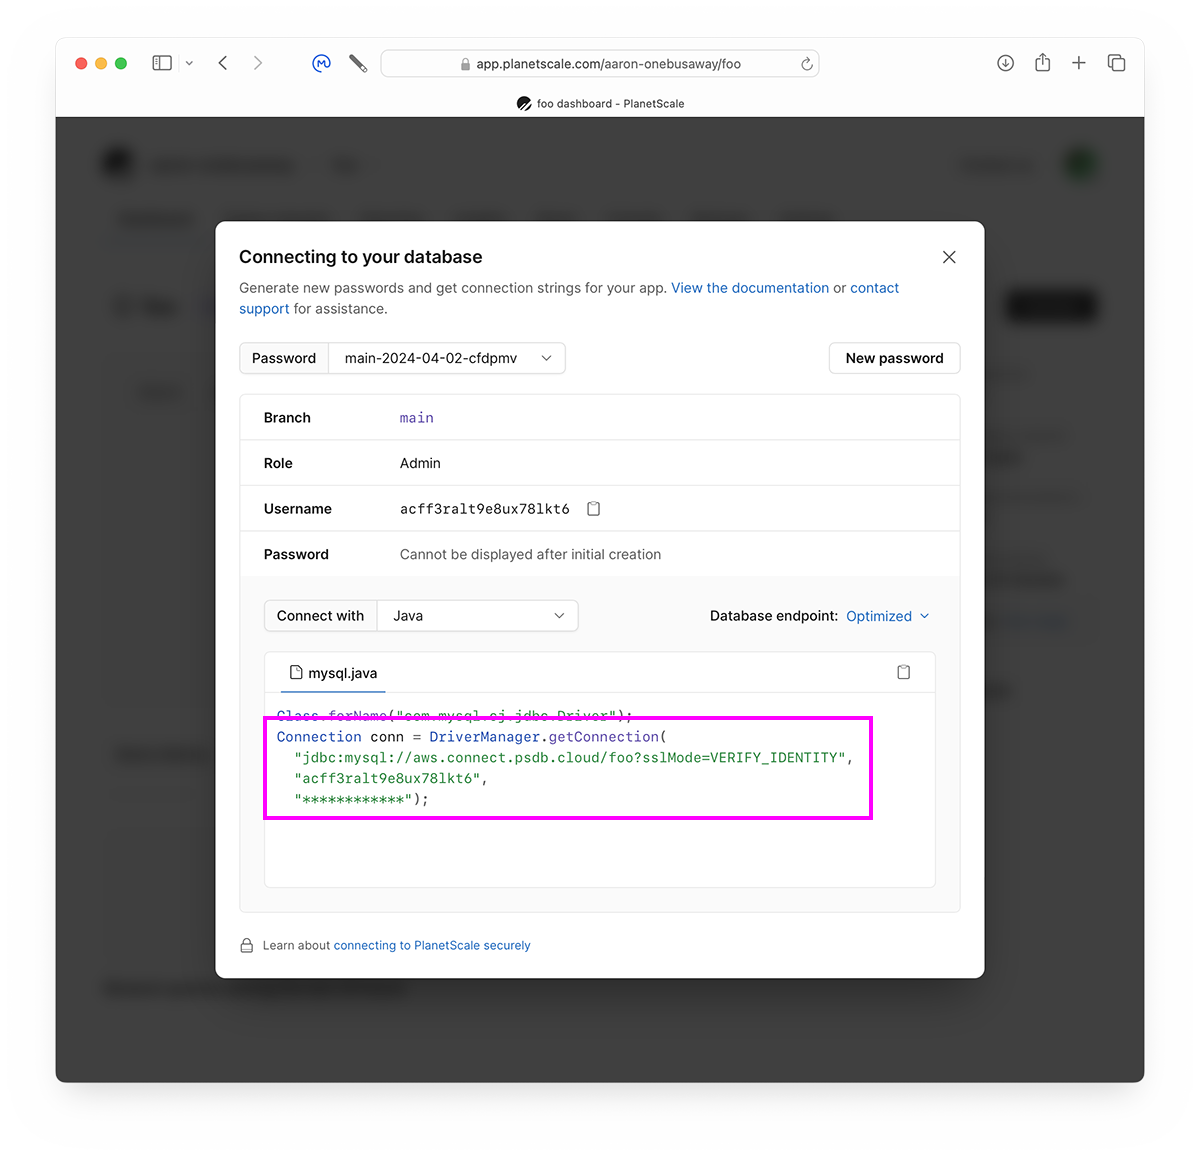
Create a JDBC connection URL
You’ll need to craft a JDBC connection URL from the data contained in the .env section. PlanetScale can help a bit, too. From the dashboard page for the new database you just created, click the Connect button, which will display the modal dialog shown below. Copy only the JDBC connection URL. Yours will look slightly different from what’s shown below, as it will have your unique database name included in the URL.
jdbc:mysql://aws.connect.psdb.cloud/YOUR_DB_NAME_GOES_HERE?sslMode=VERIFY_IDENTITY
Docker container hosting - Render
Now that our database is launched and accessible, we can turn our attention to setting up the OBA API server. Log in to Render.com, create an account, and add your credit card as needed.
Next, click the Deploy to Render button below. It will start the process of creating a new OBA API server on Render for you by downloading the render.yaml Blueprint from the OBA Docker repository. (Blueprint is Render’s term for their IaC configuration files.)

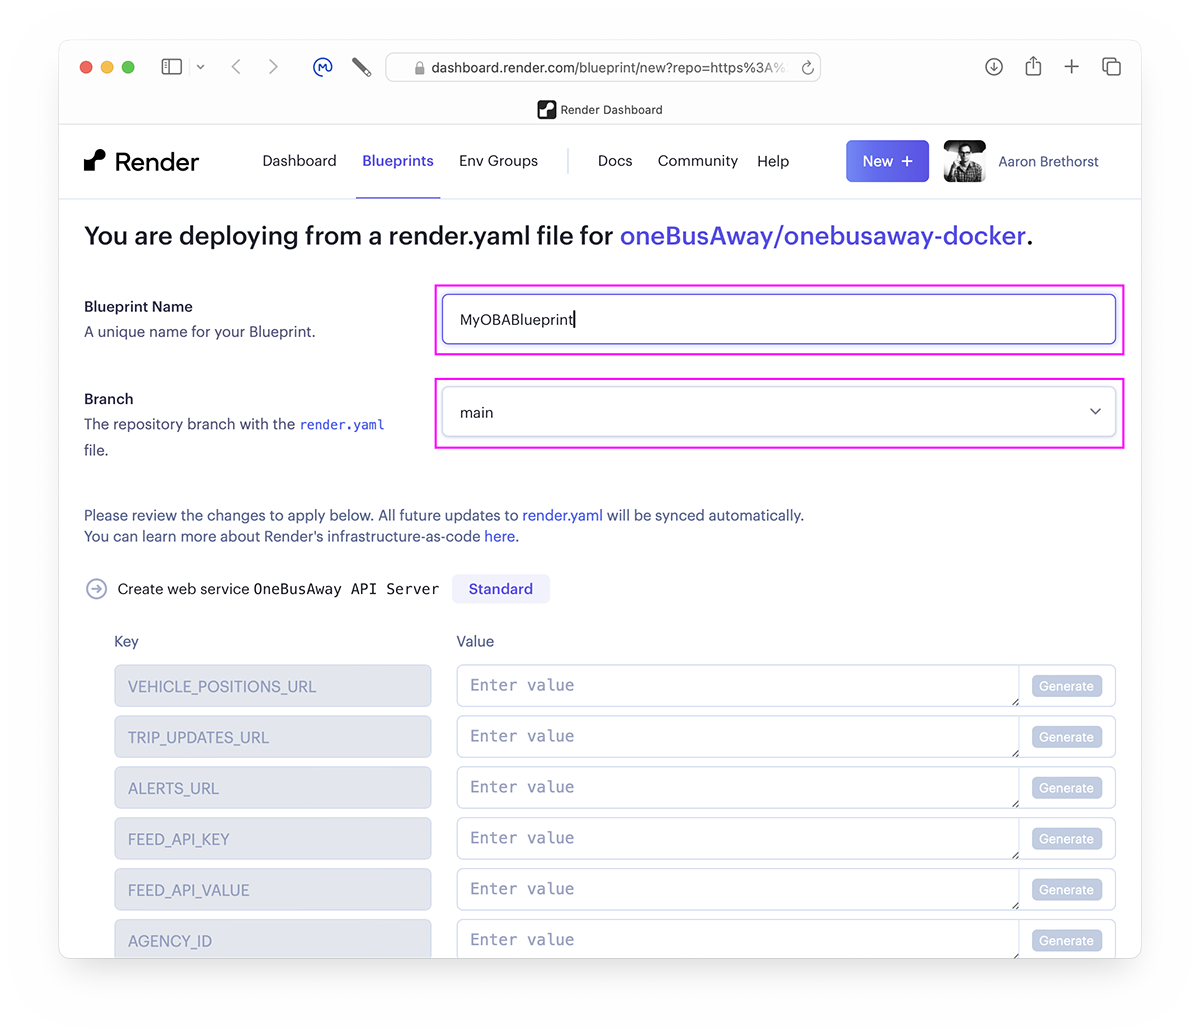
Configure the container from your Blueprint
- Blueprint Name - This can be anything you’d like, and will never be seen publicly.
- Branch - choose
main.
Key/Value pairs:
TZ- required. The timezone for the server must match the timezone specified in your agency.txt file. Technically, this is only required for GTFS-RT support.GTFS_URL- optional. The URL of your transit agency’s GTFS data zip file. Specifying this will allow the transit data bundle to be built automatically.- Database:
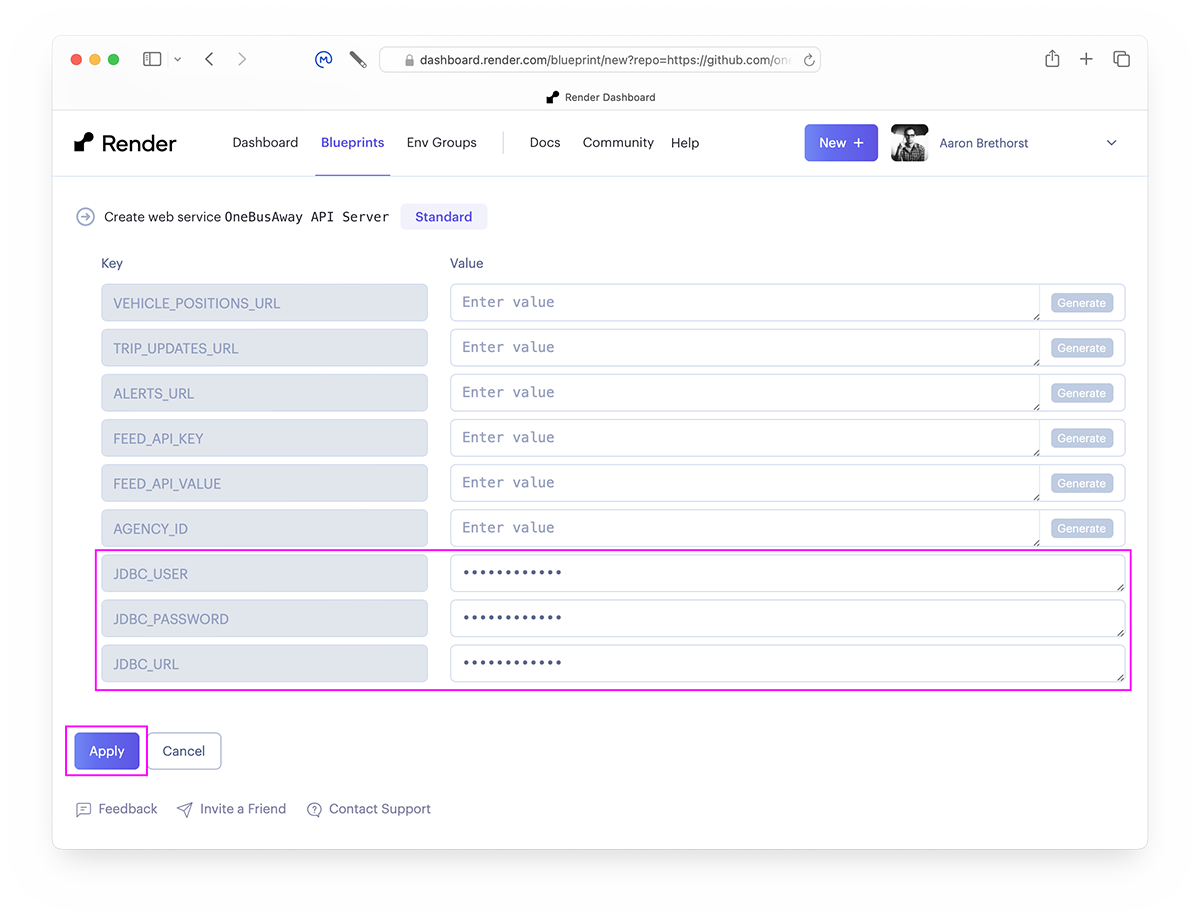
JDBC_URL- required. The JDBC connection URL we retrieved from PlanetScale.JDBC_USER- required. The MySQL database username from PlanetScale.JDBC_PASSWORD- required. The MySQL database password from PlanetScale.
- To enable GTFS-RT support:
AGENCY_ID- required. The ID of the agency in your GTFS-RT feeds. e.g.unitrans.VEHICLE_POSITIONS_URL- required. The GTFS-RT vehicle positions URL. e.g.https://example.com/gtfs-rt/vehicle-positions.pbTRIP_UPDATES_URL- required. The GTFS-RT trip updates URL. e.g.https://example.com/gtfs-rt/trip-updates.pbALERTS_URL- optional. The GTFS-RT service alerts URL. e.g.https://example.com/gtfs-rt/service-alerts.pbREFRESH_INTERVAL- optional. The refresh frequency in seconds. Defaults to30.- Authentication (optional)
FEED_API_KEY- optional. If your GTFS-RT feeds require some sort of API key to be sent as a header as part of the GET request, specify the key (i.e. the header name) here. e.g.X-MY-API-KEY.FEED_API_VALUE- optional. If your GTFS-RT feeds require some sort of API key to be sent as a header as part of the GET request, specify the value (i.e the key itself) here. e.g.1234567890abcdef.
For the purposes of this tutorial, we will skip setting up GTFS-RT. Fill in the JDBC_* fields and click the Apply button. The Apply button will disappear and an indefinite progress indicator will appear next to the Create web service label, but otherwise the page will remain unchanged for potentially several minutes. There’s nothing to worry about.
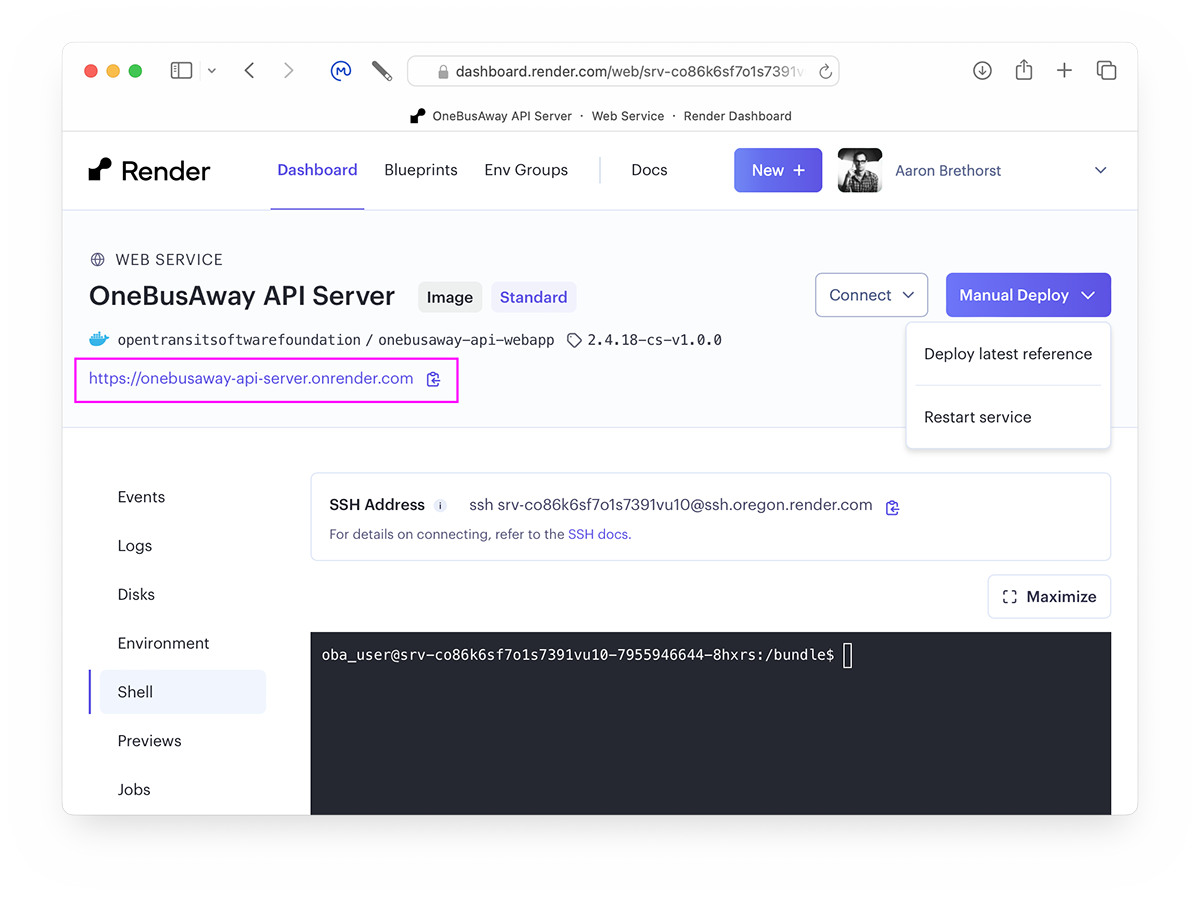
Validate the Server
Once the OBA server has rebooted (which will take a few minutes), verify that your service works as expected by creating a URL from the server’s base URL (shown in the screenshot below) and the following paths/query params:
/onebusaway-api-webapp/api/where/current-time.json?key=org.onebusaway.iphone/onebusaway-api-webapp/api/where/agencies-with-coverage.json?key=org.onebusaway.iphone/onebusaway-api-webapp/api/where/routes-for-agency/{AGENCY ID FROM PREVIOUS STEP GOES HERE}.json?key=org.onebusaway.iphone/onebusaway-api-webapp/api/where/stops-for-route/{ROUTE ID FROM PREVIOUS STEP GOES HERE}.json?key=org.onebusaway.iphone/onebusaway-api-webapp/api/where/stop/{STOP ID FROM PREVIOUS STEP GOES HERE}.json?key=org.onebusaway.iphone
Conclusion
Congratulations, you’ve deployed a OneBusAway API server! 🎉
Now you’re ready to set up GTFS-RT feeds, add a Google Maps API key to the web UI, and start testing with the iOS and Android mobile apps. More guides are coming soon to help you with these steps. Please don’t hesitate to reach out on our developer docs GitHub repo with questions, corrections, offers to help, or anything else that comes to mind.